
Command Line
Documentation of the various command line options of the Meteor tool.
The following are some of the more commonly used commands in the meteor command-line tool. This is just an overview and does not mention every command or every option to every command; for more details, use the meteor help command.
meteor help
Get help on meteor command line usage.
meteor helpLists the common meteor commands.
meteor help <command>Prints detailed help about the specific command.
meteor run
Run a meteor development server in the current project.
meteor runTIP
This is the default command. Simply running meteor is the same as meteor run.
Features
- Automatically detects and applies changes to your application's source files
- No Internet connection required
- Accesses the application at localhost:3000 by default
- Searches upward from the current directory for the root directory of a Meteor project
Options
| Option | Description |
|---|---|
--port, -p <port> | Port to listen on (default: 3000). Also uses port N+1 and a port specified by --app-port. Specify as --port=host:port to bind to a specific interface |
--open, -o | Opens a browser window when the app starts |
--inspect[-brk][=<port>] | Enable server-side debugging via debugging clients. With --inspect-brk, pauses at startup (default port: 9229) |
--mobile-server <url> | Location where mobile builds connect (defaults to local IP and port). Can include URL scheme (e.g., https://example.com:443) |
--cordova-server-port <port> | Local port where Cordova will serve content |
--production | Simulate production mode. Minify and bundle CSS and JS files |
--raw-logs | Run without parsing logs from stdout and stderr (default: true) |
--timestamps | Run with timestamps in logs, the same as passing --raw-logs=false. |
--settings, -s <file> | Set optional data for Meteor.settings on the server |
--release <version> | Specify the release of Meteor to use |
--verbose | Print all output from builds logs |
--no-lint | Don't run linters used by the app on every rebuild |
--no-release-check | Don't run the release updater to check for new releases |
--allow-incompatible-update | Allow packages to be upgraded or downgraded to potentially incompatible versions |
--extra-packages <packages> | Run with additional packages (comma separated, e.g., "package-name1, package-name2@1.2.3") |
--exclude-archs <archs> | Don't create bundles for certain web architectures (comma separated, e.g., "web.browser.legacy, web.cordova") |
Node.js Options
To pass additional options to Node.js, use the SERVER_NODE_OPTIONS environment variable:
Windows PowerShell:
$env:SERVER_NODE_OPTIONS = '--inspect' | meteor runLinux/macOS:
SERVER_NODE_OPTIONS=--inspect-brk meteor runQuoted values are supported, which is useful when an option contains special characters:
SERVER_NODE_OPTIONS='--max-old-space-size=4096 --inspect' meteor runPort Configuration Example
meteor run --port 4000This command:
- Runs the development server on
http://localhost:4000 - Runs the development MongoDB instance on
mongodb://localhost:4001
INFO
The development server always uses port N+1 for the default MongoDB instance, where N is the application port.
meteor debug
Run the project with the server process suspended for debugging.
Deprecation Notice
The meteor debug command has been superseded by the more flexible --inspect and --inspect-brk command-line flags, which work with run, test, and test-packages commands.
Modern Debugging Approach
# Debug server with auto-attachment
meteor run --inspect

# Debug server and pause at start
meteor run --inspect-brk
Command Usage
meteor debug [--debug-port <port>]How It Works
- Server process suspends just before the first statement of server code execution
- Debugger listens for incoming connections on port 5858 by default
- Use
--debug-port <port>to specify a different port
Setting Breakpoints
- Use the
debuggerkeyword in your code - Set breakpoints through the debugging client's UI (e.g., in the "Sources" tab)
Debugging Clients
You can use either:
- Web-based Node Inspector
- Command-line debugger
Node Inspector Console Bug
Due to a bug in node-inspector, pressing "Enter" after a command in the Node Inspector Console may not successfully send the command to the server.
Workarounds:
- Use Safari browser
- Use
meteor shellto interact with the server console - Apply the hot-patch available in this comment
Differences from Node.js Flags
The Meteor --inspect and --inspect-brk flags work similarly to Node.js flags with two key differences:
- They affect the server process spawned by the build process, not the build process itself
- The
--inspect-brkflag pauses execution after server code has loaded but before it begins to execute
Alternative Approach
The same debugging functionality can be achieved by adding the --debug-port <port> option to other Meteor commands:
meteor run --debug-port 5858
meteor test-packages --debug-port 5858
meteor profile
Run a performance profile for your Meteor application to analyze build and bundling performance.
meteor profile [<meteor-run-options>...]Availability
This command is available from Meteor 3.2 and newer.
Usage
This command monitors the bundler process and tracks key performance metrics to help analyze build and bundling performance.
Options
| Option | Description |
|---|---|
--size | Monitor both bundle runtime and size |
--size-only | Monitor only the bundle size |
--build | Monitor build time |
INFO
All other options from meteor run are also supported (e.g., --settings, --exclude-archs). If you use the --build option, it also accepts meteor build flags (e.g. --mobile-settings, --architecture).
Environment Variables
| Variable | Description | Default |
|---|---|---|
METEOR_IDLE_TIMEOUT=<seconds> | Set a timeout for profiling | 90 seconds |
METEOR_CLIENT_ENTRYPOINT=<path> | Set a custom client entrypoint | From package.json |
METEOR_SERVER_ENTRYPOINT=<path> | Set a custom server entrypoint | From package.json |
METEOR_LOG_DIR=<path> | Set a custom log directory | Default log directory |
TIP
The default timeout (90s) is usually enough for each build step to complete. If you encounter errors due to early exits, increase the METEOR_IDLE_TIMEOUT value.
Example Usage
# Basic profile
meteor profile

# Monitor bundle size only
meteor profile --size-only

# Monitor build time
meteor profile --build

# Profile with custom settings and timeout
METEOR_IDLE_TIMEOUT=120 meteor profile --settings settings.json

# Profile with custom entrypoints
METEOR_CLIENT_ENTRYPOINT=client/main.js METEOR_SERVER_ENTRYPOINT=server/main.js meteor profile
Customizing the Profiling Process
You can pass any option that works with meteor run to customize the profiling process. This allows you to profile your application under specific conditions that match your deployment environment. The same applies to the --build option, which matches meteor build options.
meteor create app-name
Create a new Meteor project in a directory called app-name.
meteor create [options] app-nameDefault Behavior
Without any flags, meteor create app-name generates a React project.
Interactive Wizard
If you run meteor create without arguments, Meteor will launch an interactive wizard that guides you through selecting your project name and application type:
  ~ What is the name/path of your app?
  ~ Which skeleton do you want to use?
  Blaze     # To create an app using Blaze
  Full      # To create a more complete scaffolded app
  Minimal   # To create an app with as few Meteor packages as possible
  React     # To create a basic React-based app
  Typescript # To create an app using TypeScript and React
  Typescript-tailwind # To create an app using TypeScript, React, and Tailwind
  Vue       # To create a basic Vue3-based app
  Svelte    # To create a basic Svelte app
  Tailwind # To create an app using React and Tailwind
  Chakra-ui # To create an app Chakra UI and React
  Solid # To create a basic Solid app
  Apollo # To create a basic Apollo + React app
  Bare # To create an empty app
Basic Options
| Option | Description |
|---|---|
--release <version> | Specify Meteor version (e.g., --release 3.4) |
--prototype | Include autopublish and insecure packages for rapid prototyping (not for production) |
Application Types
| Option | Description | Tutorial / Example |
|---|---|---|
--react | Create a React app (default) | Meteor 3 with React, Meteor 2 with React |
--vue | Vue 3 + Tailwind CSS | Meteor 3 with Vue, Meteor 2 with Vue |
--svelte | Svelte | Meteor 2 with Svelte |
--blaze | Basic Blaze app | Meteor 2 with Blaze |
--solid | Solid | Meteor 2 with Solid Example |
--apollo | React + Apollo (GraphQL) | Meteor 2 with GraphQL |
--typescript | React + TypeScript | TypeScript Guide |
--tailwind | React + Tailwind CSS | - |
--typescript-tailwind | React + TypeScript + Tailwind CSS | - |
--chakra-ui | React + Chakra UI | Simple Tasks Example |
--coffeescript | CoffeeScript | - |
--babel | React with Babel support | - |
--angular | Angular + Typescript | - |
Project Structure Options
| Option | Description |
|---|---|
--minimal | Create with minimal Meteor packages |
--bare | Create an empty app (Blaze + MongoDB) |
--full | Create a fully scaffolded app with imports-based structure (Blaze + MongoDB) |
--package | Create a new package instead of an application |
Prototype Mode
The --prototype option adds packages that make development faster but shouldn't be used in production. See the security checklist.
Included Packages
React App (--react or default)
NPM packages:
@babel/runtime,meteor-node-stubs,react,react-dom
Meteor packages:
meteor-base,mobile-experience,mongo,reactive-var,standard-minifier-css,standard-minifier-js,es5-shim,ecmascript,typescript,shell-server,hot-module-replacement,static-html,react-meteor-data
Apollo (GraphQL) App (--apollo)
NPM packages:
@apollo/client,@apollo/server,@babel/runtime,graphqlmeteor-node-stubs,react,react-dom
Meteor packages:
meteor-base,mobile-experience,mongo,reactive-var,standard-minifier-css,standard-minifier-js,es5-shim,ecmascript,typescript,shell-server,hot-module-replacement,static-html,apollo,compat:graphql
Blaze App (--blaze)
NPM packages:
@babel/runtime,meteor-node-stubs,jquery
Meteor packages:
meteor-base,mobile-experience,mongo,blaze-html-templates,jquery,reactive-var,tracker,standard-minifier-css,standard-minifier-js,es5-shim,ecmascript,typescript,shell-server,hot-module-replacement,blaze-hot
Vue App (--vue)
NPM packages:
@babel/runtime,meteor-node-stubs,vue,vue-meteor-tracker,vue-router,@types/meteor,@vitejs/plugin-vue,autoprefixer,meteor-vite,postcss,tailwindcss,vite
Meteor packages:
meteor-base,mobile-experience,mongo,reactive-var,standard-minifier-css,standard-minifier-js,es5-shim,ecmascript,typescript,shell-server,hot-module-replacement,static-html,jorgenvatle:vite
Minimal App (--minimal)
NPM packages:
@babel/runtime,meteor-node-stubs
Meteor packages:
meteor,standard-minifier-css,standard-minifier-js,es5-shim,ecmascript,typescript,shell-server,static-html,webapp,ddp,server-render,hot-module-replacement
File Structure
To learn more about the recommended file structure for Meteor apps, check the Meteor Guide.
Community Examples
Meteor ships with a collection of example apps that cover specific use cases, great for studying how features work in practice and drawing inspiration from more complete codebases. Official examples live in the meteor/examples repository, while community-contributed ones link to their own repos.
To browse available examples with descriptions, tech stack, demo links, and repository URLs:
meteor create --listTo create a new app from an example:
meteor create my-app --example simple-tasks| Option | Description |
|---|---|
--example <slug> | Create from a community example |
--list | Show detailed list of available examples |
Create from a Git Repository
You can create a new Meteor app by cloning any Git repository:
meteor create my-app --from https://github.com/fredmaiaarantes/simpletasksTo extract a specific subdirectory from a repository, use --from-dir. You can also pin to a specific branch, tag, or commit SHA with --from-branch:
meteor create my-app --from https://github.com/meteor/examples --from-branch main --from-dir parties--from also accepts browser-style tree/src URLs from GitHub, GitLab, and Bitbucket. When you paste one, Meteor auto-detects the branch and subdirectory from the URL, so --from-branch and --from-dir become optional:
meteor create my-app --from https://github.com/meteor/examples/tree/main/partiesSupported URL patterns:
- GitHub —
https://github.com/<owner>/<repo>/tree/<branch>[/<path>] - GitLab —
https://gitlab.com/<owner>/<repo>/-/tree/<branch>[/<path>] - Bitbucket —
https://bitbucket.org/<owner>/<repo>/src/<branch>[/<path>]
Passing --from-branch or --from-dir explicitly overrides the values parsed from the URL.
| Option | Description |
|---|---|
--from <url> | Clone a Meteor project from a Git URL. Accepts GitHub, GitLab, and Bitbucket tree/src URLs; branch and subdirectory are auto-detected from the URL when possible. |
--from-branch <ref> | Git ref to check out — accepts a branch, tag, or commit SHA. Overrides the branch parsed from the URL. |
--from-dir <dir> | Extract only a subdirectory (overrides the subdirectory parsed from the URL). |
meteor generate
meteor generate is a command to generate boilerplate for your current project. meteor generate receives a name as a parameter, and generates files containing code to create a Collection with that name, Methods to perform basic CRUD operations on that Collection, and a Subscription to read its data with reactivity from the client.
If you run meteor generate without arguments, it will ask you for a name, and name the auto-generated Collection accordingly. It will also ask if you do want Methods for your API and Publications to be generated as well.
Important to note: By default, the generator will generate JavaScript code. If you have a
tsconfig.jsonfile in your project, it will generate TypeScript code instead.
Example:
meteor generate customerRunning the command above will generate the following code in /imports/api:
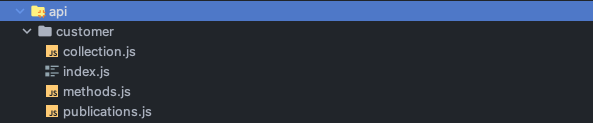
That will have the following code:
collection.js
import { Mongo } from 'meteor/mongo';

export const CustomerCollection = new Mongo.Collection('customer');
methods.js
import { Meteor } from 'meteor/meteor';
import { check } from 'meteor/check';
import { CustomerCollection } from './collection';

export async function create(data) {
  return CustomerCollection.insertAsync({ ...data });
}

export async function update(_id, data) {
  check(_id, String);
  return CustomerCollection.updateAsync(_id, { ...data });
}

export async function remove(_id) {
  check(_id, String);
  return CustomerCollection.removeAsync(_id);
}

export async function findById(_id) {
  check(_id, String);
  return CustomerCollection.findOneAsync(_id);
}

Meteor.methods({
  'Customer.create': create,
  'Customer.update': update,
  'Customer.remove': remove,
  'Customer.find': findById
});
publication.js
import { Meteor } from 'meteor/meteor';
import { CustomerCollection } from './collection';

Meteor.publish('allCustomers', function publishCustomers() {
  return CustomerCollection.find({});
});
index.js
export * from './collection';
export * from './methods';
export * from './publications';
path option
If you want the generated files to be placed in a specific directory, you can use the --path option to tell meteor generate where to place the new files. In the example below, meteor generate will create a collection called another-customer and place the collection.ts, methods.ts, publications.ts and index.ts files inside the server/admin directory. In this example, we will assume the user has a tsconfig.json file in their project folder, and generate TypeScript instead.
meteor generate another-customer --path=server/adminIt will generate our files in the server/admin folder:
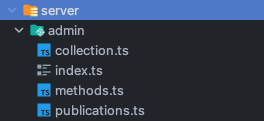
collection.ts
import { Mongo } from 'meteor/mongo';

export type AnotherCustomer = {
  _id?: string;
  name: string;
  createdAt: Date;
}

export const AnotherCustomerCollection = new Mongo.Collection<AnotherCustomer>('another-customer');
methods.ts
import { Meteor } from 'meteor/meteor';
import { Mongo } from 'meteor/mongo';
import { check } from 'meteor/check';
import { AnotherCustomer, AnotherCustomerCollection } from './collection';

export async function create(data: AnotherCustomer) {
  return AnotherCustomerCollection.insertAsync({ ...data });
}

export async function update(_id: string, data: Mongo.Modifier<AnotherCustomer>) {
  check(_id, String);
  return AnotherCustomerCollection.updateAsync(_id, { ...data });
}

export async function remove(_id: string) {
  check(_id, String);
  return AnotherCustomerCollection.removeAsync(_id);
}

export async function findById(_id: string) {
  check(_id, String);
  return AnotherCustomerCollection.findOneAsync(_id);
}

Meteor.methods({
  'AnotherCustomer.create': create,
  'AnotherCustomer.update': update,
  'AnotherCustomer.remove': remove,
  'AnotherCustomer.find': findById
});
publications.ts
import { Meteor } from 'meteor/meteor';
import { AnotherCustomerCollection } from './collection';

Meteor.publish('allAnotherCustomers', function publishAnotherCustomers() {
  return AnotherCustomerCollection.find({});
});
index.ts
export * from './collection';
export * from './methods';
export * from './publications';
Using the Wizard
Running meteor-generate without arguments will start a little wizard in your terminal, which will ask you the name of your Collection, and whether you want Methods and Publications to be generated as well.
meteor generate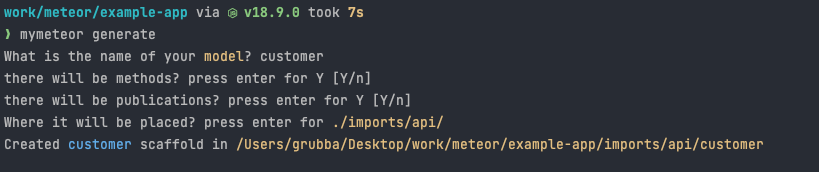
Using your own template
You may customize the output of meteor generate by providing a directory with a "template". A template directory is just a folder provide by you with .js/.ts files, which are copied over.
To use an user-provided template, you should pass in a template directory URL so that it can copy it with its changes.
--templatePath
meteor generate feed --templatePath=/scaffolds-ts
Note that this is not a full-blown CLI framework inside Meteor.
meteor generateis just a command for generating code that is common in Meteor projects. Check out Yargs, Inquirer or Commander for more information about CLI frameworks.
How to rename things?
In addition to your own template folder, you can pass a JavaScript file to meteor-generate to perform certain transformations in your template files. That file is just a normal .js file that should export two functions: transformName and transformContents, which are used to modify the file names and contents, respectively.
If you don't want to write such a file yourself, a few functions are provided out of the box to replace strings like $$name$$, $$PascalName$$ and $$camelName$$ in your template files. The internal Meteor template files (which is used when you don't pass a template folder through the --templatePath option) are implemented this way - they include those special strings which get replaced to generate your files.
These replacements come from this function from Meteor's CLI:
scaffoldName is a string with the name that you have passed as argument.
const transformName = (name) => {
    return name.replace(/\$\$name\$\$|\$\$PascalName\$\$|\$\$camelName\$\$/g, function (substring, args) {
      if (substring === '$$name$$') return scaffoldName;
      if (substring === '$$PascalName$$') return toPascalCase(scaffoldName);
      if (substring === '$$camelName$$') return toCamelCase(scaffoldName);
    })
  }
How to replace things in your own templates?
--replaceFn
If you do want to customize how your templates are generated, you can pass a .js file with the --replaceFn option, as described above. When you pass in given a .js file with an implementation for those two functions, Meteor will use your functions instead of the default ones.
example of a replacer file
export function transformFilename(scaffoldName, filename) {
  console.log(scaffoldName, filename);
  return filename;
}

export function transformContents(scaffoldName, fileContents, filename) {
  console.log(filename, fileContents);
  return contents;
}
If you run your command like this:
meteor generate feed --replaceFn=/fn/replace.jsIt will generate files full of $$PascalCase$$ strings using the Meteor provided templates, ignoring the name provided by the user (feed). Since we aren't replacing them with anything in the example above, the Meteor template files are copied as they are.
A more real-world usage of this feature could be done with the following .js file:
const toPascalCase = (str) => {
  if(!str.includes('-')) return str.charAt(0).toUpperCase() + str.slice(1);
  else return str.split('-').map(toPascalCase).join('');
}
const toCamelCase = (str) => {
  if(!str.includes('-')) return str.charAt(0).toLowerCase() + str.slice(1);
  else return str.split('-').map(toPascalCase).join('');
}

const transformName = (scaffoldName, str) => {
    return str.replace(/\$\$name\$\$|\$\$PascalName\$\$|\$\$camelName\$\$/g, function (substring, args) {
      if (substring === '$$name$$') return scaffoldName;
      if (substring === '$$PascalName$$') return toPascalCase(scaffoldName);
      if (substring === '$$camelName$$') return toCamelCase(scaffoldName);
    })

}

export function transformFilename(scaffoldName, filename) {
  return transformName(scaffoldName, filename);
}

export function transformContents(scaffoldName, contents, fileName) {
  return transformName(scaffoldName, contents);
}
meteor login
Logs you in to your Meteor developer account.
Usage:
meteor login [--email]Details:
- Prompts for your username and password
- Pass
--emailto log in by email address rather than by username - You can set
METEOR_SESSION_FILE=token.jsonbeforemeteor loginto generate a login session token, avoiding the need to share credentials with third-party service providers
meteor logout
Logs you out of your Meteor developer account.
Usage:
meteor logoutmeteor whoami
Displays your currently logged-in username.
Usage:
meteor whoamimeteor deploy site
Deploys the project in your current directory to Galaxy.
Basic Deployment
meteor deploy your-app.meteorapp.comDeployment Options
| Option | Description |
|---|---|
--delete, -D | Permanently delete this deployment |
--debug | Deploy in debug mode (don't minify, etc.) |
--settings, -s <file> | Set optional data for Meteor.settings |
--free | Deploy as a free app (with limitations) |
--mongo | Create and connect to a free shared MongoDB database |
--plan <plan> | Set app plan: professional, essentials, or free |
--container-size <size> | Set container size: tiny, compact, standard, double, quad, octa, or dozen |
--owner | Specify organization or user account to deploy to |
--cache-build | Reuse the build if the git commit hash is the same |
--allow-incompatible-update | Allow packages to be upgraded or downgraded to potentially incompatible versions |
--deploy-polling-timeout <ms> | Time to wait for build/deploy (defaults to 15 minutes) |
--no-wait | Exit after code upload instead of waiting for deploy to complete |
Free Deployment
Deploy a free app with MongoDB using:
meteor deploy your-app.meteorapp.com --free --mongoQuick Start
The combination of --free and --mongo is the fastest way to deploy an app without any additional configuration.
Free App Limitations
- Domain: Must use a Meteor domain (
.meteorapp.com,.au.meteorapp.com, or.eu.meteorapp.com) - Cold Start: App stops after 30 minutes of inactivity and restarts on next connection
- Resources: Limited to one Tiny container (not recommended for production use)
MongoDB Options
Shared MongoDB (Free)
The --mongo option creates a database in Galaxy's shared cluster:
- On first deploy, you'll receive your MongoDB URI in the console
- The URI is also visible in your app's version details in Galaxy
- You must create at least one document to fully instantiate the database
- The database can be accessed using any MongoDB client with the provided URI
WARNING
Free shared MongoDB is not recommended for production applications. The shared cluster doesn't provide backups or restoration resources.
MongoDB Connection Settings
When connecting to the free MongoDB shared cluster using your own settings, include:
{
  "packages": {
    "mongo": {
      "options": {
        "tlsAllowInvalidCertificates": true
      }
    }
  }
}
Why is this needed?
This is necessary because the database provider doesn't have certificates installed on every machine. More about this option here.
Important Notes
- Settings persist between deployments unless explicitly changed
- Your project should be a git repository (commit hash is used to track code changes)
- Free apps and MongoDB shared hosting are not recommended for production use
- Meteor Software reserves the right to stop or remove applications that abuse the free plan
Version Compatibility
--freeand--mongooptions were introduced in Meteor 2.0--planoption was introduced in Meteor 2.1--container-sizeoption was introduced in Meteor 2.4.1--cache-buildoption is available since Meteor 1.11
meteor update
Updates your Meteor application while maintaining compatibility.
Usage:
meteor update
meteor update --patch
meteor update --release <release>
meteor update --packages-only
meteor update [packageName packageName2 ...]
meteor update --all-packages
Update Types:
| Command | Description |
|---|---|
meteor update | Updates the Meteor release and compatible package versions |
meteor update --patch | Updates to the latest patch release (recommended for bug fixes) |
meteor update --release <release> | Updates to a specific Meteor release |
meteor update --packages-only | Updates only packages, not the Meteor release |
meteor update [packageName ...] | Updates specific named packages |
meteor update --all-packages | Updates all packages including indirect dependencies |
Important Notes:
- Every project is pinned to a specific Meteor release
- By default, updates will not break compatibility between packages
- Patch releases contain minor, critical bug fixes and are highly recommended
- The
--releaseflag can override compatibility checks (may cause warnings) - The
--all-packagesoption will update all packages to their latest compatible versions, respecting dependency constraints
meteor add package
Adds packages to your Meteor project.
Usage:
meteor add [package1] [package2] ...
meteor add package@version
Version Constraints:
package@1.1.0- Version 1.1.0 or higher (but not 2.0.0+)package@=1.1.0- Exactly version 1.1.0package@=1.0.0 || =2.0.1- Either version 1.0.0 or 2.0.1 exactly
Notes:
- By convention, community packages include the maintainer's name (e.g.,
iron:router) - To remove a version constraint, run
meteor add packagewithout specifying a version
meteor remove package
Removes a package previously added to your Meteor project.
Usage:
meteor remove [package1] [package2] ...Notes:
- For a list of currently used packages, run
meteor list - This removes the package entirely (to only remove version constraints, use
meteor add) - Transitive dependencies aren't automatically downgraded unless necessary
meteor list
Lists all packages added to your project, including versions and available updates.
Usage:
meteor list [flags]Flags:
| Flag | Description |
|---|---|
--tree | Outputs a tree showing package reference hierarchy |
--json | Outputs an unformatted JSON string of package references |
--weak | Shows weakly referenced dependencies (only with --tree or --json) |
--details | Adds more package details (only with --json) |
meteor add-platform platform
Adds platforms to your Meteor project.
Usage:
meteor add-platform [platform1] [platform2] ...Notes:
- Multiple platforms can be added with one command
- After adding, use
meteor run <platform>to run on that platform - Use
meteor buildto build for all added platforms
meteor remove-platform platform
Removes a previously added platform.
Usage:
meteor remove-platform [platform]Notes:
- For a list of currently added platforms, use
meteor list-platforms
meteor list-platforms
Lists all platforms explicitly added to your project.
Usage:
meteor list-platformsmeteor ensure-cordova-dependencies
Checks if dependencies are installed, and installs them if necessary.
Usage:
meteor ensure-cordova-dependenciesmeteor mongo
Opens a MongoDB shell on your local development database.
Usage:
meteor mongoWARNING
For now, you must already have your application running locally with meteor run. This will be easier in the future.
meteor reset
Resets the current project to a fresh state and clears the local cache.
Usage:
meteor reset [--db]Flags:
--db- Also removes the local MongoDB database
WARNING
Reset with --db flag deletes your data! Make sure you do not have any information you care about in your local mongo database by running meteor mongo. From the mongo shell, use show collections and db.<collection>.find() to inspect your data.
WARNING
For now, you cannot run this while a development server is running. Quit all running meteor applications before running this.
meteor build
Package your project for deployment.
meteor build <output-path> [options]Output Artifacts
The command produces deployment-ready artifacts for all platforms in your project:
- Server Bundle: A tarball containing everything needed to run the application server
- Android Package: AAB/APK bundle and Android project source (if Android platform is added)
- iOS Package: Xcode project source (if iOS platform is added)
Self-Hosting
You can use the server bundle to host a Meteor application on your own infrastructure instead of Galaxy. Note that you'll need to handle logging, monitoring, backups, and load-balancing yourself.
Options
| Option | Description |
|---|---|
--debug | Build in debug mode (don't minify, preserve source maps) |
--directory | Output a directory instead of a tarball (existing output location will be deleted first) |
--server-only | Skip building mobile apps but still build the 'web.cordova' client target for hot code push |
--mobile-settings <file> | Set the initial value of Meteor.settings in mobile apps |
--server <url> | Location where mobile builds connect to the Meteor server (defaults to localhost:3000) |
--architecture <arch> | Build for a different architecture than your development machine |
--allow-incompatible-update | Allow packages to be upgraded/downgraded to potentially incompatible versions |
--platforms <platforms> | Build only for specified platforms (when available) |
--packageType <type> | Choose between apk or bundle for Android builds (defaults to bundle) |
Available Architectures
Valid architectures include:
os.osx.x86_64os.linux.x86_64os.linux.x86_32os.windows.x86_32os.windows.x86_64
This option selects the architecture of binary-dependent Atmosphere packages. If your project doesn't use Atmosphere packages with binary dependencies, --architecture has no effect.
Examples
# Basic build
meteor build ../build

# Output a directory instead of a tarball
meteor build ../build --directory

# Debug build (unminified)
meteor build ../build --debug

# Build only the server (skip mobile apps)
meteor build ../build --server-only

# Build for specific platforms
meteor build ../build --platforms=android,ios

# Set server location for mobile apps
meteor build ../build --server=https://example.com:443

# Build for a different architecture
meteor build ../build --architecture=os.linux.x86_64

# Specify Android package type
meteor build ../build --packageType=apk
meteor lint
Run linters on your Meteor application code.
meteor lint [options]Description
This command:
- Performs a complete build of your application
- Runs all configured linters
- Outputs build errors and linting warnings to standard output
CI Integration
The meteor lint command is particularly useful for continuous integration environments to catch code quality issues before deployment.
Options
| Option | Description |
|---|---|
--allow-incompatible-update | Allow packages to be upgraded or downgraded to potentially incompatible versions if required to satisfy all package version constraints |
Example Usage
# Basic usage
meteor lint

# Allow incompatible package updates during linting
meteor lint --allow-incompatible-update
WARNING
Linting errors will prevent your application from being built successfully. Fixing these errors is required for deployment.
meteor search
Search for Meteor packages and releases.
meteor search <regex> [options]Description
Searches through the Meteor package and release database for items whose names match the specified regular expression.
Default Behavior
By default, the search will not show:
- Packages without official versions (e.g., those with only prereleases)
- Packages known to be incompatible with Meteor 0.9.0 and later due to migration issues
Options
| Option | Description |
|---|---|
--maintainer <username> | Filter results by authorized maintainer |
--show-all | Show all matches, including prereleases and incompatible packages |
--ejson | Display more detailed output in EJSON format |
Examples
# Search for all packages related to "auth"
meteor search auth

# Search for packages maintained by a specific user
meteor search mongo --maintainer meteor

# Show all matching packages, including prereleases
meteor search bootstrap --show-all

# Get detailed output in EJSON format
meteor search react --ejson
Advanced Searching
You can use regular expressions for more powerful searches:
# Packages that start with "react-"
meteor search "^react-"

# Packages that end with "router"
meteor search "router$"
meteor show
Display detailed information about packages and releases.
meteor show <name> [options]
meteor show <name@version> [options]
meteor show [options]
Description
Shows detailed information about a specific package or release, including:
- Name and summary
- Available versions
- Maintainers
- Homepage and git URL (if specified)
- Exports and other package metadata
TIP
This works on both local packages built from source and remote packages stored on the server.
Common Usage
View Package Information
# Show information about a package
meteor show jam:easy-schema

# Show information about a specific version
meteor show jam:easy-schema@1.7.0

# Show information about the local version
meteor show jam:easy-schema@local
View Meteor Releases
# Show recommended Meteor releases
meteor show METEOR

# Show all Meteor releases (including intermediate ones)
meteor show METEOR --show-all
Options
| Option | Description |
|---|---|
--show-all | Show hidden versions, experimental releases, and incompatible packages |
--ejson | Display more detailed output in EJSON format |
Examples
# Running from a package directory shows info for that package
cd ~/my-package
meteor show

# View detailed EJSON output
meteor show react-meteor-data --ejson
Default Behavior
By default, Meteor:
- Shows no more than five versions
- Hides experimental release versions
- Hides packages incompatible with Meteor 0.9.0 and later
Version Selection
For version-specific information (like exports), Meteor will use:
- The local version, if available
- The latest official version, if no local version exists
meteor publish
Publish a package to Atmosphere (Meteor package server).
meteor publish [options]
meteor publish --update
Description
Publishes a new version of a local package to Atmosphere. Must be run from the package directory.
Package Naming Convention
Published package names must begin with the maintainer's Meteor Developer Account username and a colon, like username:package-name.
Common Operations
Publish a New Package
cd my-package
meteor publish --create
Update an Existing Package
cd my-package
meteor publish
Update Package Metadata
Update README, description, or other metadata without changing the code:
cd my-package
meteor publish --update
Options
| Option | Description |
|---|---|
--create | Publish a new package for the first time |
--update | Update metadata of a previously published version (README, git URL, description, etc.) |
--allow-incompatible-update | Allow dependencies to be upgraded/downgraded to potentially incompatible versions |
--no-lint | Skip linting the package and its local dependencies before publishing |
Architecture-Specific Packages
For packages with binary components:
- Regular
publishwill only upload the build for your current architecture - Use
meteor publish-for-archfrom a different machine to upload builds for other architectures
Package Publication Process
When you publish a package:
- Meteor reads version information from
package.js - Builds the package
- Sends both source code and built version to the package server
- Marks you as the sole maintainer (use
meteor admin maintainersto modify)
Examples
# Publish a new package
meteor publish --create

# Update an existing package
meteor publish

# Update metadata only
meteor publish --update

# Publish without linting
meteor publish --no-lint
TIP
Use meteor show to preview how your package information will appear in the package server.
meteor publish-for-arch
Publish architecture-specific builds of a package.
meteor publish-for-arch packageName@versionDescription
Creates and publishes a build of an existing package version for a different architecture than the one initially published.
Architecture Support
Meteor currently supports the following architectures:
- 32-bit Linux
- 64-bit Linux (used by Galaxy servers)
- 64-bit macOS
Use Case
When a package contains platform-specific components (like npm modules with native code), running meteor publish only creates a build for your current architecture. To make your package usable on other architectures, you need to run publish-for-arch from machines with those architectures.
How It Works
- Run the command on a machine with the target architecture
- Meteor downloads your package's source and dependencies from the package server
- Builds the package for the current architecture
- Uploads the architecture-specific build to the package server
No Source Required
You don't need to have a copy of your package's source code to run this command. Meteor automatically downloads everything needed from the package server.
Example Workflow
Imagine you've published a package with binary components from a Mac:
# On your Mac
cd my-binary-package
meteor publish --create
To make it available for Linux users:
# Later, on a 64-bit Linux machine
meteor publish-for-arch username:my-binary-package@1.0.0
meteor publish-release
Publish a new Meteor release.
meteor publish-release <path-to-json-config> [options]Description
Publishes a new release of Meteor based on a JSON configuration file. This allows you to create custom Meteor releases or release tracks.
Release Tracks
Meteor releases are divided into tracks:
- Only Meteor Software can publish to the default Meteor track
- Anyone can create and publish to their own custom tracks
- Users won't switch tracks when running
meteor updateunless specified
Configuration File Format
The JSON configuration file must contain:
{
  "track": "TRACK_NAME",          // Release track (e.g., "METEOR")
  "version": "VERSION",           // Version number (e.g., "2.8.0")
  "recommended": true|false,      // Is this a recommended release?
  "description": "DESCRIPTION",   // Brief description of the release
  "tool": "PACKAGE@VERSION",      // The meteor tool package and version
  "packages": {                   // Specific package versions for this release
    "package1": "version",
    "package2": "version"
  },
  "patchFrom": ["VERSION1", "VERSION2"]  // Optional: releases this patches
}
Prerequisites
You must publish all package versions to the package server before you can specify them in a release.
Options
| Option | Description |
|---|---|
--create-track | Create and publish a new release track |
Recommended Flag
- Set
recommended: truefor stable releases (e.g., METEOR@3.2.2) - Set
recommended: falsefor release candidates, experimental releases, etc.
Patch Releases
Use the patchFrom field to specify a patch release:
- Lists releases this new release patches
- Automatically unrecommends the releases specified in
patchFrom
Examples
Publishing a New Release Track
meteor publish-release my-release-config.json --create-trackPublishing a New Release
meteor publish-release meteor-3.3.0.jsonSample Configuration File
{
  "track": "MYCORP",
  "version": "1.0.0",
  "recommended": true,
  "description": "MyCompany's custom Meteor release",
  "tool": "meteor-tool@2.8.0",
  "packages": {
    "accounts-base": "2.2.5",
    "mongo": "1.15.0"
  }
}
Custom Tool Forks
This system allows forks of the meteor tool to be published as packages, letting users switch to custom tool implementations by changing to the corresponding release.
meteor test-packages
Run tests for Meteor packages.
meteor test-packages [options] [package...]Description
Runs unit tests for one or more packages. Test results appear in a browser dashboard that updates whenever relevant source files are modified.
Package Specification
Packages can be specified by:
- Name: Resolved using the standard package search algorithm
- Path: Any argument containing a '/' is loaded from that directory path
If no packages are specified, all available packages will be tested.
Options
| Option | Description |
|---|---|
--port, -p <port> | Port to listen on (default: 3000). Also uses ports N+1 and N+2 |
--open, -o | Opens a browser window when the app starts |
--inspect[-brk][=<port>] | Enable server-side debugging (default port: 9229) |
--settings, -s <file> | Set optional data for Meteor.settings on the server |
--production | Simulate production mode (minify and bundle CSS, JS files) |
--driver-package <package> | Test driver package to use (e.g., meteortesting:mocha) |
--filter, -f | Filter the tests by name |
--verbose | Print all output from build logs |
--no-lint | Skip running linters on every test app rebuild |
--extra-packages <packages> | Run with additional packages (comma separated) |
--test-app-path <path> | Set directory for temporary test app (default: system temp dir) |
Mobile Testing Options
| Option | Description |
|---|---|
--ios, --android | Run tests in an emulator |
--ios-device, --android-device | Run tests on a connected device |
--mobile-server <url> | Server location for mobile builds (default: local IP and port) |
--cordova-server-port <port> | Local port where Cordova will serve content |
Examples
Test specific packages by name
meteor test-packages accounts-base accounts-passwordTest a package by path
meteor test-packages ./packages/my-packageTest with custom settings
meteor test-packages --settings settings.jsonTest with Mocha test driver
meteor test-packages --driver-package meteortesting:mochaTest with filter
meteor test-packages --filter myTestNameAlternatively, you can use the TINYTEST_FILTER environment variable to filter:
TINYTEST_FILTER=myTestName meteor test-packagesTest on mobile device
meteor test-packages --ios-devicemeteor admin
Administrative commands for official Meteor services.
meteor admin <command> [args]Authorization Required
These commands require authorization to use.
Available Commands
| Command | Description |
|---|---|
maintainers | View or change package maintainers |
recommend-release | Recommend a previously published release |
change-homepage | Change the homepage URL of a package |
list-organizations | List the organizations of which you are a member |
members | View or change the members of an organization |
get-machine | Open an SSH shell to a machine in the Meteor build farm |
Usage Examples
# View or change package maintainers
meteor admin maintainers packagename [add/remove] [username]

# Change a package homepage
meteor admin change-homepage packagename [url]

# List your organizations
meteor admin list-organizations

# Manage organization members
meteor admin members organization-name [add/remove] [username]
Detailed Help
For more information on any admin command, run:
meteor help admin <command>meteor shell
Start an interactive JavaScript shell for evaluating server-side code.
meteor shellDescription
The meteor shell command connects to a running Meteor server and provides an interactive JavaScript REPL (Read-Eval-Print Loop) for executing server-side code.
Connection Behavior
- Requires a running Meteor server in the application directory
- If no server is available, it will keep trying to connect until successful
- Multiple shells can be attached to the same server simultaneously
Features
Server Integration
- Exiting the shell does not terminate the server
- If the server restarts (due to code changes or errors), the shell will automatically restart with it
- You can manually trigger a reload by typing
.reloadin the shell
Developer Experience
| Feature | Description |
|---|---|
| Tab Completion | Built-in tab completion for global variables like Meteor, Mongo, and Package |
| Persistent History | Command history is maintained across sessions |
| Command Recall | Access previously-run commands using the up arrow key |
Example Usage
# Start a Meteor server in one terminal
meteor run

# Connect a shell in another terminal
meteor shell

# Now you can run server-side code interactively:
> Meteor.users.find().count()
> Package.mongo.Mongo.Collection.prototype
> Meteor.isServer
true
> .reload  # Manually restart the shell
Advanced Example
// Query the database
> db = Package.mongo.MongoInternals.defaultRemoteCollectionDriver().mongo.db
> db.collection('users').find().toArray()

// Access Meteor settings
> Meteor.settings.public

// Inspect publications
> Object.keys(Meteor.server.publish_handlers)
meteor npm
Run npm commands using Meteor's bundled npm version.
meteor npm <command> [args...]Description
The meteor npm command executes npm commands using the version bundled with Meteor itself.
Benefits of Using Meteor's npm
- Ensures compatibility with Meteor's Node.js version
- Crucial for packages with native dependencies (like
bcrypt) - No need to install npm separately
- Consistent behavior across development environments
Common Commands
| Command | Description |
|---|---|
meteor npm install | Install all dependencies listed in package.json |
meteor npm install <package> --save | Install and save a package as a dependency |
meteor npm install <package> --save-dev | Install and save a package as a development dependency |
meteor npm update | Update all packages to their latest allowed versions |
meteor npm ls | List installed packages |
meteor npm rebuild | Rebuild packages that have native dependencies |
Examples
# Install a package and save to dependencies
meteor npm install lodash --save

# Install packages from package.json
meteor npm install

# Run an npm script defined in package.json
meteor npm run start

# View package information
meteor npm info react
Native Dependencies
Using meteor npm instead of regular npm is especially important when working with packages that have binary dependencies making native C calls (like bcrypt). This ensures they're built with the same libraries used by Meteor.
meteor node
Run Node.js commands using Meteor's bundled Node.js version.
meteor node [options] [script.js] [arguments]Alternative
Consider using meteor shell instead, which provides similar functionality plus access to your Meteor application's server context.
Description
The meteor node command runs Node.js using the version bundled with Meteor itself.
Common Uses
| Command | Description |
|---|---|
meteor node | Start an interactive Node.js REPL |
meteor node script.js | Execute a JavaScript file |
meteor node -e "<code>" | Execute a line of JavaScript |
meteor node --version | Show Node.js version |
Examples
# Start an interactive REPL
meteor node

# Execute inline JavaScript
meteor node -e "console.log(process.versions)"

# Run a script with arguments
meteor node scripts/migrate.js --force

# Check installed Node.js version
meteor node --version
Running a Simple Script
Create hello.js:
console.log('Hello from Node.js version', process.version);
console.log('Arguments:', process.argv.slice(2));
Run it:
meteor node hello.js arg1 arg2