
1: Creating the app
1.1: Install Meteor
First, we need to install Meteor by following this installation guide.
1.2: Create Meteor Project
The easiest way to setup Meteor with Blaze is by using the command meteor create with the option --blaze and your project name:
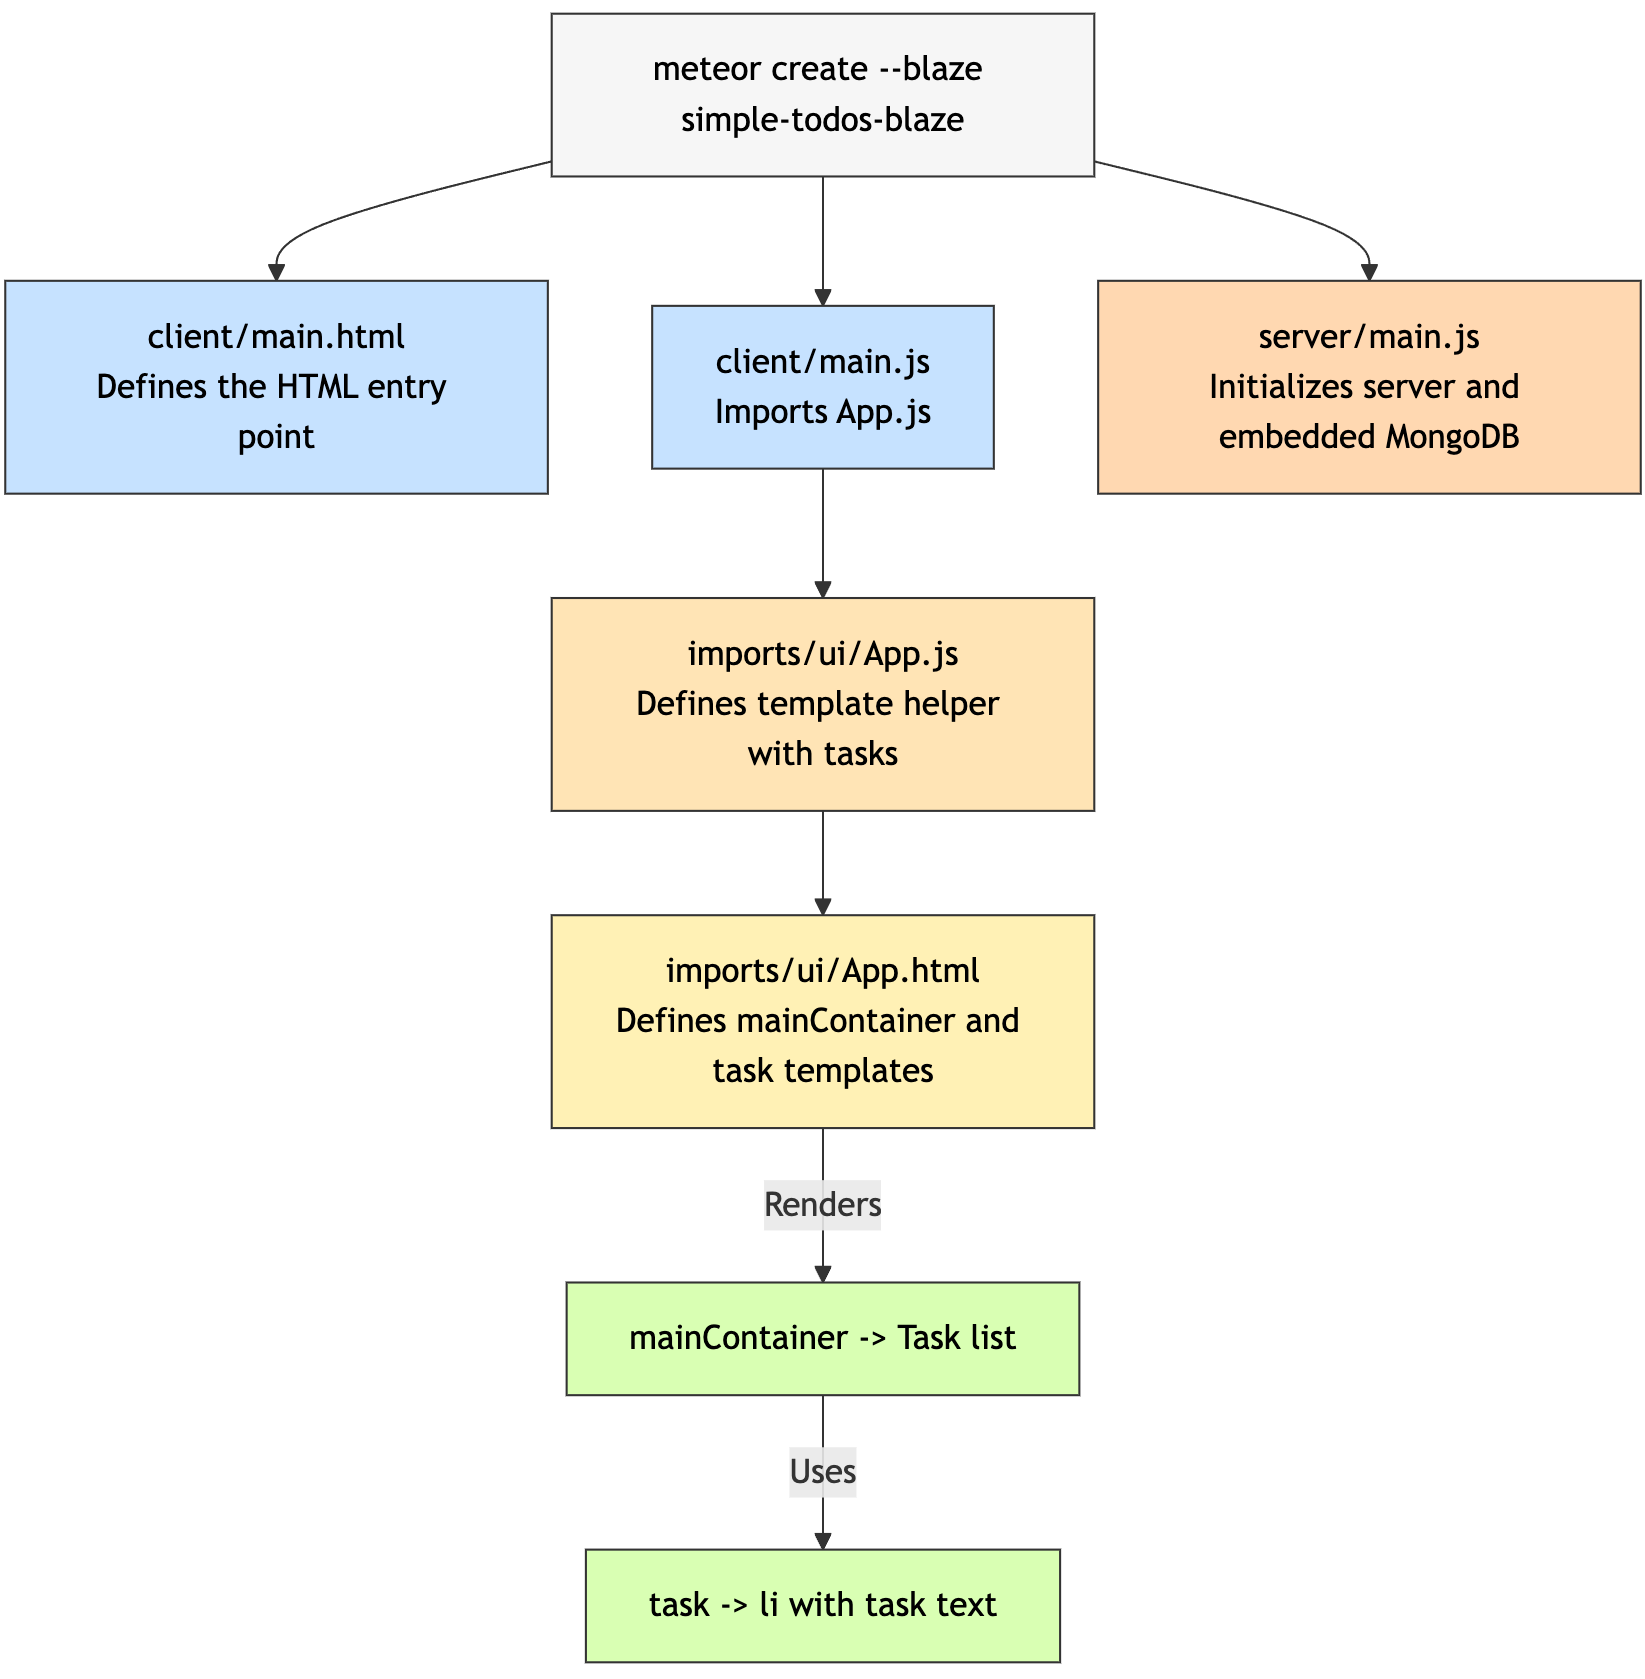
meteor create --blaze simple-todos-blazeMeteor will create all the necessary files for you. With --blaze option, Meteor generates a project using Blaze and Rspack as the bundler, and this is the approach walked through in this tutorial. Using the Rspack bundler is the default convention in Meteor 3.4+, as it improves dev speed, enables more build features, and provides better control over bundle size and configuration.
We provide the final app for both the Rspack and Meteor bundlers. This guide follows the Rspack version and reaches the same final state. The Meteor bundler version is for those who prefer the legacy bundler.
INFO
You can find the final version of this app on GitHub using the Rspack bundler or the Meteor bundler.
The files located in the client directory are setting up your client side (web), you can see for example client/main.html where Meteor is rendering your App main component into the HTML.
Also, check the server directory where Meteor is setting up the server side (Node.js), you can see the server/main.js which would be a good place to initialize your MongoDB database with some data. You don't need to install MongoDB as Meteor provides an embedded version of it ready for you to use.
You can now run your Meteor app using:
meteorDon't worry, Meteor will keep your app in sync with all your changes from now on.
Take a quick look at all the files created by Meteor, you don't need to understand them now but it's good to know where they are.
Your Blaze code will be located inside the imports/ui directory, and the App.html and App.js files will be the root component of your Blaze To-do app. We haven't made those yet but will soon.
1.3: Create Task Component
To start working on our todo list app, let’s replace the code of the default starter app with the code below. From there, we’ll talk about what it does.
First, let’s remove the body from our HTML entry-point (leaving just the <head> tag):
<head>
  <title>Simple todo</title>
</head>
Create a new directory named imports inside the simple-todos-blaze folder. In the imports folder, create another directory with the name ui and add an App.html file inside of it with the content below:
<body>
    {{> mainContainer }}
</body>

<template name="mainContainer">
    <div class="container">
        <header>
            <h1>Todo List</h1>
        </header>

        <ul>
            {{#each tasks}}
                {{> task}}
            {{/each}}
        </ul>
    </div>
</template>

<template name="task">
    <li>{{text}}</li>
</template>
We just created two templates, the mainContainer, which will be rendered in the body of our app, and it will show a header and a list of tasks that will render each item using the task template. Now, we need some data to present sample tasks on this page.
1.4: Create Sample Tasks
Create a new file called App.js in your ui folder.
Inside your entry-point main.js file, remove all the previous content and just add the code below to import the new file imports/ui/App.js:
import '../imports/ui/App.js';As you are not connecting to your server and database yet, let’s define some sample data, which we will use shortly to render a list of tasks. Add the code below to the App.js file:
import { Template } from 'meteor/templating';

import './App.html';

Template.mainContainer.helpers({
  tasks: [
    { text: 'This is task 1' },
    { text: 'This is task 2' },
    { text: 'This is task 3' },
  ],
});
Adding a helper to the mainContainer template, you are able to define the array of tasks. When the app starts, the client-side entry-point will import the App.js file, which will also import the App.html template we created in the previous step.
At this point meteor should be running on port 3000 so you can visit the running app and see your list with three tasks displayed at http://localhost:3000/ - but if meteor is not running, go to your terminal and move to the top directory of your project and type meteor then press return to launch the app.
All right! Let’s find out what all these bits of code are doing!
1.5: Rendering Data
Meteor parses HTML files and identifies three top-level tags: <head>, <body>, and <template>.
Everything inside any <head> tags is added to the head section of the HTML sent to the client, and everything inside <body> tags is added to the body section, just like in a regular HTML file.
Everything inside <template> tags is compiled into Meteor templates, which can be included inside HTML with {{> templateName}} or referenced in your JavaScript with Template.templateName.
Also, the body section can be referenced in your JavaScript with Template.body. Think of it as a special “parent” template, that can include the other child templates.
All of the code in your HTML files will be compiled with Meteor’s Spacebars compiler. Spacebars uses statements surrounded by double curly braces such as {{#each}} and {{#if}} to let you add logic and data to your views.
You can pass data into templates from your JavaScript code by defining helpers. In the code above, we defined a helper called tasks on Template.mainContainer that returns an array. Inside the template tag of the HTML, we can use {{#each tasks}} to iterate over the array and insert a task template for each value. Inside the #each block, we can display the text property of each array item using {{text}}.
1.6: Mobile Look
Let’s see how your app is looking on mobile. You can simulate a mobile environment by right clicking your app in the browser (we are assuming you are using Google Chrome, as it is the most popular browser) and then inspect, this will open a new window inside your browser called Dev Tools. In the Dev Tools you have a small icon showing a Mobile device and a Tablet:

Click on it and then select the phone that you want to simulate and in the top nav bar.
You can also check your app in your personal cellphone. To do so, connect to your App using your local IP in the navigation browser of your mobile browser.
This command should print your local IP for you on Unix systems
ifconfig | grep "inet " | grep -Fv 127.0.0.1 | awk '{print $2}'On Microsoft Windows try this in a command prompt
ipconfig | findstr "IPv4 Address"
You should see the following:
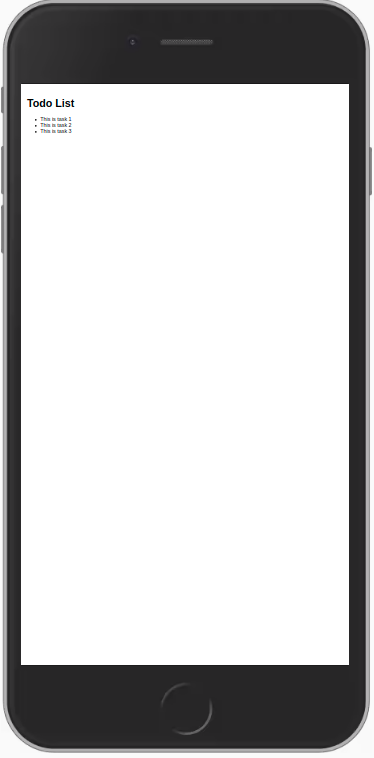
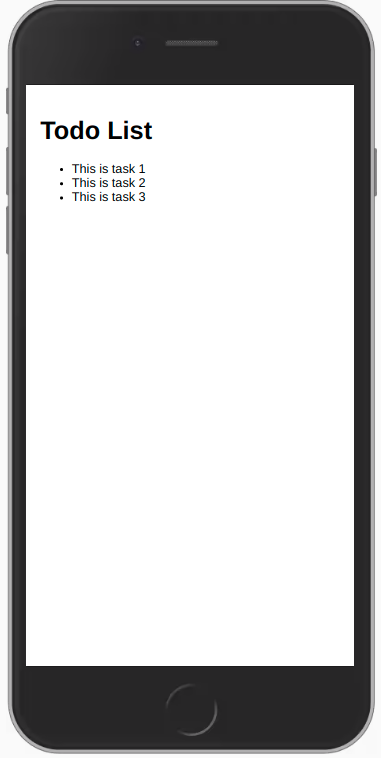
As you can see, everything is small, as we are not adjusting the view port for mobile devices. You can fix this and other similar issues by adding these lines to your client/main.html file, inside the head tag, after the title.
...
  <meta charset="utf-8"/>
  <meta http-equiv="x-ua-compatible" content="ie=edge"/>
  <meta
      name="viewport"
      content="width=device-width, height=device-height, viewport-fit=cover, initial-scale=1, maximum-scale=1, minimum-scale=1, user-scalable=no"
  />
  <meta name="mobile-web-app-capable" content="yes"/>
  <meta name="apple-mobile-web-app-capable" content="yes"/>
...
Now your app should look like this:
1.7: Hot Module Replacement
By default, when using Blaze with Meteor, a package called hot-module-replacement is already added for you. This package updates the javascript modules in a running app that were modified during a rebuild. Reduces the feedback cycle while developing, so you can view and test changes quicker (it even updates the app before the build has finished). You are also not going to lose the state, your app code will be updated, and your state will be the same.
You can read more about packages here.
You should also add the package dev-error-overlay at this point, so you can see the errors in your web browser.
meteor add dev-error-overlayYou can try to make some mistakes and then you are going to see the errors in the browser and not only in the console.
In the next step we are going to work with our MongoDB database to be able to store our tasks.